Cisco IP Phone on Asterisk via SCCP
There’s plenty of information available on the internet regarding usual SIP phones and how to connect them to Asterisk. However, when it comes to Cisco IP Phones, things start to get a little bit difficult.
As you might know, Cisco IP Phones aren’t meant to be controlled or connected to an Asterisk server – at least not via the Cisco-proprietary protocol called SCCP (Skinny Client Configuration Protocol).
As far as I know, all Cisco 79XX support two different types of firmware: SCCP and SIP. So, why don’t we just use the SIP firmware and everything is alright?
Well: The main reason is integration and compatibility. While the SIP firmware does work great with Asterisk too, the SCCP protocol provides some really cool features that just don’t even exist in the SIP protocol or they just don’t work with Asterisk.
Preparing it all
I assume that you have basic knowledge of using a terminal (Bash) and that you’re already a bit experienced when it comes to the Asterisk VoIP server.
Needed to follow the tutorial:
- Asterisk server (runs on a Raspberry Pi too)
Manages the VoIP stuff. - TFTP server (e.g. a Synology NAS, Raspberry Pi running tftpd-hpa, …)
Used to provision the Cisco phones with XML configs and firmware. - Cisco IP Phone (e.g. 7940, 7970, should work with other 79XX too)
- Phone power supply (optional, but might be required if you aren’t able to flash the phone via PoE!)
Ready? Alright, let’s continue!
Downloading the firmware
To continue, you have to identify your phone’s model. If you still don’t know it, just take a look at the upper right corner of it – pretty obvious, right?

Download the firmware for your device by looking up “cisco <model> sccp firmware” on your favorite search engine. You should be able to find a link to Cisco pretty quickly. But be warned: You need to have a service contract with Cisco to be able to download the required firmware files. If you don’t have that, you’ll have to figure out another way to get the firmware. Your favorite search engine is your friend.
Warning!
You might have to upgrade your firmware step-by-step, that means that you might not be able to directly “jump” to a new firmware version.
If the following fails, try to upgrade to an older version. (But not older than the firmware currently installed on the phone!)Take note of the currently installed firmware before trying to upgrade.
Just power the phone up without an Ethernet cable plugged in, you’ll find the firmware version in the settings.
When looking for the firmware, make sure to only download the SCCP version! You can easily distinguish SIP and SCCP by the file names:
- File name of archive might contain “sccp” or start with P00
- File names (in archive) for 7940/7960 must start with “P00” or “SCCP” instead of “P0S“
Example file name of archive for 7940/7960:cmterm-7940-7960-sccp.8-1-2SR2.tar
… and for the 7970/7971:cmterm-7970_7971-sccp.9-4-2SR1-1.zip
Extract the archive and make sure to copy all of the files inside into the root directory (/) of your TFTP server.
TFTP files
After you’ve copied the needed firmware files into the root of your TFTP directory, you’ll have to create some other files to let the phone know the required firmware version.
For 7940/7960, create the file OS79XX.TXT and make sure that it contains the name of your downloaded firmware version without any file extension. (All your extracted firmware files should have that exact string at the beginning of the file name, just the extensions should vary!)
An example for my version:
P0030801SR02For the 7970/7971 series, a file called term70.default.loads and/or term71.default.loads should already be in your root directory because it’s been included in the downloaded archive.
Next, create the file XMLDefault.cnf.xml, this file specifies the SCCP (Asterisk) server and firmware files too.
<Default>
        <callManagerGroup>
            <members>
                <member priority="0">
                    <callManager>
                        <name>Asterisk</name>
                        <ports>
                            <ethernetPhonePort>2000</ethernetPhonePort>
                        </ports>
                        <processNodeName>192.168.0.20</processNodeName>
                    </callManager>
                </member>
            </members>
        </callManagerGroup>

    <loadInformation30006 model="Cisco 7970">SCCP70.9-4-2SR1-1S</loadInformation30006>
    <loadInformation6 model="IP Phone 7970">SCCP70.9-4-2SR1-1S</loadInformation6>
    <loadInformation8 model="IP Phone 7940">P0030801SR02</loadInformation8>
    <authenticationURL></authenticationURL>
    <directoryURL></directoryURL>
    <informationURL></informationURL>
    <messagesURL></messagesURL>
    <servicesURL></servicesURL>
    <idleURL></idleURL>
    <idleTimeout>60</idleTimeout>
    <proxyServerURL />
</Default>
Make sure to replace the IP address in <processNodeName> according to your Asterisk server’s IP. Also, check that the loadInformation values match your firmware version. If you don’t need a specific model, just remove the line.
List of loadInformation keys: https://www.ukvoipforums.com/viewtopic.php?t=1214
TFTP XML per-device configs
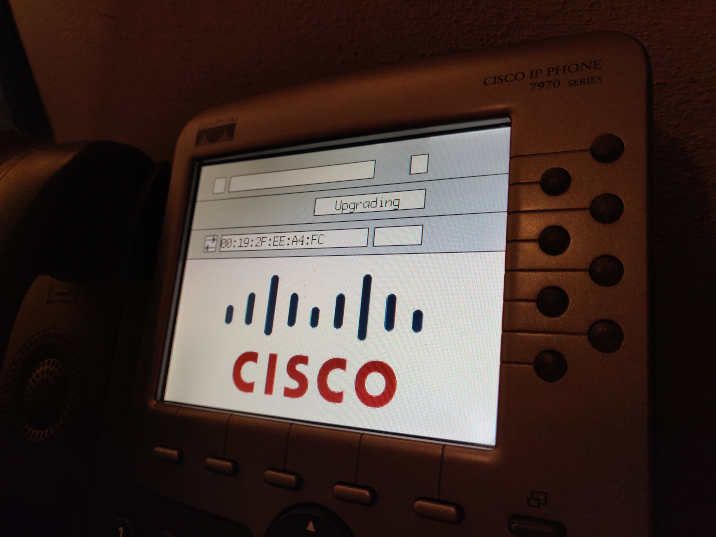
When booting, Cisco Phones try to pull a unique config file from the TFTP server for the MAC address of the device.
Naming convention with SCCP firmware:SEP<MACADDRESS>.cnf.xml
You have to create a file for each device with the MAC address.
The MAC address is located on the back of the phone and/or in the settings of the phone. Write it down somewhere, you’ll need it a few times.
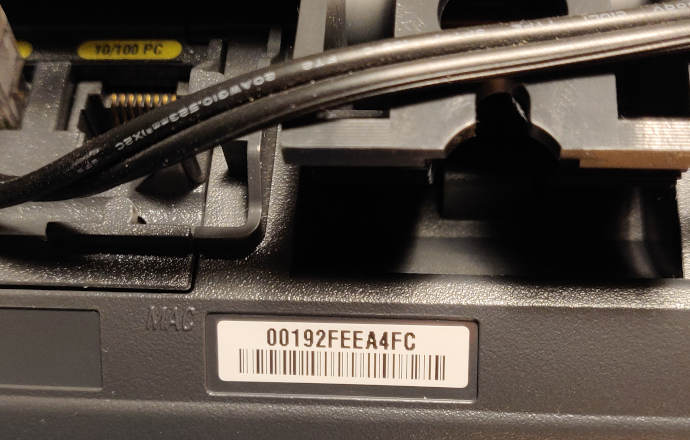
In my example, I created the file SEP00192FEEA4FC.cnf.xml
Example content for a 7970 or 7971 phone:
XML file: SEPMAC.cnf.xml (7970/7971)
Again, replace the IP address in processNodeName in callManagerGroup with the Asterisk server address.
Example for a 7940 or 7960 phone:
XML file: SEPMAC.cnf.xml (7940/7960)
Just like above: Make sure to replace the IP address. For a 7940/60, you’ll also have to replace the loadInformation with the correct firmware value.
Important!
Do not connect the phone to the network yet.
Installing chan-sccp
I assume that you already installed Asterisk – I’m running it on a Raspberry Pi. In the next few steps we’ll install chan-sccp – it’s a replacement driver for the already included SCCP solution in Asterisk.
Start by opening up a root terminal session, find yourself some place where you can freely clone the repository.
git clone https://github.com/chan-sccp/chan-sccp.git chan-sccp
cd chan-sccp
Now that we’re in the chan-sccp folder, we’ll configure chan-sccp to add some useful features like conferencing.
./configure --enable-conference --enable-advanced-functionsIf the command throws any errors, try to fix it by looking up the error on the web. If that doesn’t help, feel free to ask in the comments and I’ll try my best to help out. But now, let’s compile and install chan-sccp.
make -j2 && make install && make reloadAccording to chan-sccp’s README, make sure you have the following asterisk modules loaded before loading the chan_sccp module – you don’t have to do this if /etc/asterisk/modules.conf already contains autoload=yes.
- app_voicemail
- bridge_simple
- bridge_native_rtp
- bridge_softmix
- bridge_holding
- res_stasis
- res_stasis_device_state
Also, make sure that /etc/asterisk/modules.conf contains the following line:noload => chan_skinny.so
This prevents the default SCCP module from loading – it would prevent chan-sccp from loading because they would try to listen on the same port.
Setting up chan-sccp
We’re getting closer! Let’s setup /etc/asterisk/sccp.conf
Take a look at the following configuration file and change it according to your needs:
https://www.encrypted.at/asterisk-sccp-conf/
Make sure to change the MAC address in the brackets. Also, verify that the device type matches with your phone and that you’ve entered the correct dialplan context (in my case: phones). You can add more devices, lines and even softkeysets. More information over at https://github.com/chan-sccp/chan-sccp/wiki/setup-sccp.conf
In your /etc/asterisk/extensions.conf, add your extensions to an existing (or newly created) context:exten => 201,Dial(SCCP/201)
https://github.com/chan-sccp/chan-sccp/wiki/Dialplan might be helpful when it comes to dialplan issues.
Restart Asterisk
Finishing up all Asterisk changes – a restart is required./etc/init.d/asterisk restart
If Asterisk restarted without any errors (check the logs and asterisk -r -vvvvv), you can continue now.
TFTP: DHCP option
In order for the phone to find the TFTP server, you’ll have to add option 66 and 150 with the TFTP IP address.
If you’re running a router with OpenWRT, that’s actually pretty easy.
Starting the firmware upgrade
Alright, let’s do this. Unplug your phone from the power if it’s currently connected. Plug in the Ethernet cable – now press and hold the #-button. While doing that, plug in the power again. Keep holding # until the headset/microphone/speaker buttons and/or line buttons start flashing in sequence.
We now have 60 seconds to enter the following factory reset combination:
1, 2, 3, 4, 5, 6, 7, 8, 9, *, 0, #
Make sure to enter it exactly like that (however, pressing a button multiple times won’t affect the procedure – for example, 1112234455667899*0# works too)
If the phone asks “Keep network cfg?“ – press 2 for no.
Further thoughts
If everything went well your phone should now start up and register to the Asterisk server as an SCCP device.
Check out the following links for some other cool stuff:
Feedback appreciated!
Feel free to ask questions or give feedback (comments button on the right side of the website), I’d highly appreciate it!
See you around.
Very nice article about the chan-sccp project and a great help to potential newcomers to using asterisk + cisco phones in skinny mode !