Changing the Android captive portal page
If you don’t want your Android phone to always contact a Google server when switching networks, the following article might be useful!
It’s pretty easy to switch the captive portal check URL on an Android phone. But first…
What is a captive portal?
Ever been connected to a public or hotel WiFi? Chances are, if you tried to connect to it, your phone notified you that you had to “Sign in to Wi-Fi network” – and that’s what a captive portal is: The page that has to be accepted before being able to surf on the net. In some cases like in a hotel, you might have to log in on that page too. You can read more about captive portals on Wikipedia.
But, why should I change it?
Well, on Android 6 or higher, every time you switch networks, your phone tries to access the following URL:
http://connectivitycheck.gstatic.com/generate_204As we can see, gstatic.com – Google’s servers. We might not want Google to know our new IP address or when we switched between networks. So… Why don’t we just self-host it? It’s pretty easy.
Self-hosting it
To self-host the page, you just need a web server and some ability to return your own HTTP status code – we’ll need a “204 No Content” here.
Here’s my PHP script:
<?php
header("HTTP/1.0 204 No Content");
die();
After that, you can change the URL on your phone.
Changing the URL
To change the URL, open up a shell/terminal connection to your phone. You can do this with a Terminal emulator (e.g. Termux) or with adb. In my case, I did it with adb and a USB cable.
To start the adb session, connect your phone to your PC with a USB cable and enter adb shell in your terminal. Accept the dialog on your phone.
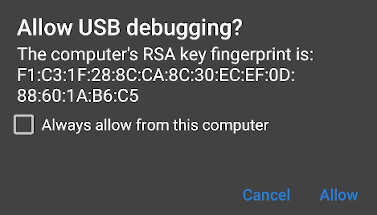
You should now be greeted with a shell: PhoneName:/ $
Change the URL with the following commands:
settings put global captive_portal_http_url "http://<YOUR-URL>"
settings put global captive_portal_https_url "https://<YOUR-URL>"
Replace <YOUR-URL> with your own link. Ensure that your web server does not forward http:// to https:// because that would mean a 301 status code instead of 204! You should start seeing access entries in your web server log as soon as you reconnect to your wireless network.
My URLs
If you want to, you can just use my URLs – logging is disabled here:
settings put global captive_portal_http_url "http://conntest.yxa.at/204.php"
settings put global captive_portal_https_url "https://conntest.yxa.at/204.php?https"
That’s it!
You’ve now changed your captive portal link on your Android device.
You might want to change the link in your Firefox browser too.
Thank you for the explanation!
I didn’t even know that this page was called up every time.
Will put it into practice in the next few days.
Very well explained, even for people who don’t understand much in the subject.